Showing posts with label Photography lessons. Show all posts

Monday, February 25, 2013

North Texas Horse County Equine Photography Workshop


North Texas Horse County Equine Photography Workshop
Presented by Terri Cage Photography
April 19-21, 2013
Denton County, Texas

Spend a weekend photographing some of the most beautiful horses and ranches in the area. Anyone from beginners to the more experienced will enjoy this workshop. Examples* of some of the places we will visit will include mare and foals, cutting horses, Friesians, Mustangs in training, liberty shoots, beautiful scenery, barns, and more!

Any camera type is welcome, but it is recommended that you use a DSLR with at least a 100mm lens (200mm preferred). If you have a larger lens, you may bring it also, it might be too much lens in some cases, but you also might be glad you have it occasionally  If you do not have any of these, I can suggest places that rent these items.
You can sign up for the whole weekend or just part of it!

Here is the plan:
Friday: 5-9 p.m. Basic photography skills and camera functions – if you are shooting on auto, you need to attend this or you will not understand the rest of the workshop. You will learn: use of light and composition of subjects, the basic functions of your camera, and what all the buttons do.
Saturday : Sunrise to sunset. We will visit a couple ranches, then have lunch and review some of the images that everyone has taken and go over some equine photography tips. Then we learn the benefits of giving back, donating time to local rescues. We will make one last stop at another ranch and spend several hours there.  Near the end, we will use some off-camera/artificial lighting to achieve some dramatic images!
Sunday: A quick morning visit to another ranch for one last hands-on session, then an early lunch and classroom work. We will spend several hours on post production using Lightroom 4 and Photoshop CS6. If you do not have these, free 30-day trial versions are available. I would wait until a few days before the workshop before you download. I am not a Lightroom or Photoshop guru, but I can show many basic uses and easy fixes to get you started in understanding their functions. We will end the day with learning the business, which will be great for those wanting to start their own photography business, not just equine. You will learn things I wish I knew when starting out.
*These are what is planned, but because of the nature of the horse business, some circumstances may change the actual subjects or locations.

What is included:
  • Electronic handouts
  • Lunch on Saturday and Sunday
  • Snacks throughout the weekend
  • Online gallery for you to share images with ranch owners
  • Model & property releases
What is not included:
  • Breakfast & dinner
  • Transportation – we will have a meet-up place and I encourage carpooling from ranch to ranch.
  • Lodging- I can recommend some local hotels. If you want to split a room, I can put you in contact with others that want to do the same
  • Camera equipment
  • Computer equipment
What you should bring:
Taken at one of the ranches scheduled to visit
  • Appropriate, comfortable clothing- Be prepared to shoot in any kind of weather condition. Heavy downpours, or severe weather may change the agenda for the day, other wise we stay on schedule. Raingear is recommended to bring. Pastures are very damp in the morning and you will get wet. I suggest wearing rubber boots in pastures. Bring a change of clothes just in case!
  • Camera
  • Back-up camera if you have one
  • Lens – At least a 100mm. I use a 70-200 most of the time. Also a wide angle lens.
  • Plenty of battery power and a charger
  • Lots of memory cards
  • Monopod- This will really save your arms for long days.
  • Tripod is optional- may not use when we are close to horses, but great for some scenic images and inside of barns
  • Anything else you can think of- I live by the saying, “It’s better to have it and not need it, than need it and not have it.”
What is required:
Photoshop techniques
  • To watch an equine safety PowerPoint presentation that will be sent to those attending
  • You will need to sign waiver/releases before.
  • You will need to agree to some safety rules.
Payment plan available!

How to get 50% off the Complete Workshop
Facebook
Post a favorite horse related photo to my Facebook Page and get an entry. Have your friends like my page & like your photo and get another entry for each like.

Twitter
Follow me on twitter and send me a message and get another entry.

I will draw and announce the winner on March 15!

Thursday, June 2, 2011

Vacation Time: What camera should you buy? Part II

In the Part I five basic points were suggested in considering a camera to purchase for your vacation. Price, camera size. brand, ease of use and your subject matter. Price and brand were covered pretty much as needs to be. Just a few things to touch on.
Taken With a Sony a350


As with the price, if you think you might use your new camera in more situations after your vacation, then you might want to budget more. Do have children in you near future, nieces, nephews, yours, friends? Have you recently retired, looking for a new hobby or are you planning on traveling more in the future? Photography can be addicting. Don’t forget to budget for batteries, memory cards and camera case.

Taken with a Canon 5D MKII
A little more on camera size. Think about the nature of your vacation. Are you doing a lot of sight-seeing, shopping, camping, hiking or taking a cruise? Are you going to be in high populated areas, large crowds? Are you going to want to keep up with a large camera case? If you really want to capture your memories, you should be more willing want lug it around. Never fails when you don’t bring it, there is always a perfect photo op that you just missed.
Taken With Panasonic DMC-FZ7
Are you technically challenged, never read the manual and toss it aside or do read it cover to cover. This is where ease of use needs to be brought up. A good hint for the finding the technicality of a camera is to look at the manual before you buy. How many pages and will you read them. The thicker the manual than more frustrating it may be for someone who in a non-manual reader. Most stores won’t let you open up the box just to see the manual. But if they have a display camera, they should have a manual. If not locate the manual on-line. The more the technical a camera, in most cases the higher the price. In my opinion, if you are going to only going to shoot on auto, opt for the less expensive point and shoot rather than the DSLR.

Taken with a Sony a350
Next point to keep in mind if what will be the majority of you subject matter. Scenery, architecture, indoor, low light situation, action or even underwater. Will you be in damp or wet areas or dry and dusty. There are plenty of cameras that are marketed for certain types of situations and there are plenty that work in most. Some of the features on cameras will increase the price of the camera, so it is a feature you won’t need or want you may want to look at a few more cameras. Once again I want to remind you to check the photography restrictions on the places you want to visit.

I would  be glad you help you find a good camera to fit your needs and once you get your camera, be sure to sign up for photography lessons. If you decide that it is too much hassle to take photos, bring me along as your own personal vacation photographer and photojournalist (wink wink).

Check out these articles on popular vacation spots for photography

The attached photos were taken with:
Canon 5D Mark II  This is a great camera, but is expensive and large. Unless you are very serious about photography it alot to keep up with while on vacation.
Panasonic DMC-FZ7  Have had this camera for 6 years and it has held up great.  It is now my daughter's camera and she really enjoyes it.  Not recommended for low light.  Has a high zoom capapilites, but as with any digital zoom you loose image quality.
Sony a350 Had a lot of fun with this DSLR, was pretty easy to carry around too.

Other camera's linked on this page are just to show examples, not recommending or saying they are inferior to other similiar prodeucts.
Camera reviews DP Review 

Camera retailers
BH Photo
Adorama
Don't forget to get plenty of memory for the extend of your vaction if you are unable to upload images to another source until you return home.

Tuesday, May 31, 2011

Vacation Time: What camera should you buy? Part I

It is getting close for summer vacations and I know last year I was asked by many on what type of camera they should buy. There are 100’s even 1000’s of models of cameras so there is one to fit your needs. If you do your homework you shouldn’t be disappointed in the one you buy. If  buy the 1st one you see on sale, you might me unsatisfied.

Here is a good checklist to develop a starting point.
Price

Size

Brand

Ease of use

Subject matter

Price is always the first thing I ask, it gives a great starting point on where they should look. I do encourage everyone to spend just a little more than they budgeted for. Cut your vacation budget somewhere else and opt for a higher quality camera. That expensive dinner will be with you for only so long. The photos you take will last a lifetime. Of course you can always take a photo of your dinner with a camera.

Size of the camera and accessories is the next question. Do you want something that will fit in your pocket or purse or are you willing to carry a full camera bag/backpack? It also brings up another thing to consider, is the place you are going; what is the danger of theft. You don’t want to make yourself a target, as some areas see you as someone with money if you have a big expensive camera. Plus the camera itself is a target.

Brand of the cameras you are familiar with or may currently own is another question. If you already own brand X and it is highly rated, I suggest you stay with it. The reason being is you may already own accessories that will work with your current brand. Also many of the settings, button, knobs and so forth may be similar making it easier for you to use and understand.

Ease of use is important to know in case you have a good understanding of camera functions and settings or you are one of those who leave it on “Auto” all the time. Leaving it on Auto is perfectly fine; I think a majority of people do. If you are an “auto” person and I am sure not going to have you spend the extra money for a camera that has all the bells and whistles.

Knowing Subject matter is important to know what features you will need. Are you planning on taking a lot of indoor photos with low light and no flash is allowed or a bunch of landscapes. Are you the type that takes only scenery photos or do you put your friends and family in the photo too?

Warning: Do your research on where you are visiting and if they allow photos at certain venues. Don’t spend tons on a camera/lens that can take good low light photos just to find out they do not allow cameras in the building.

Coming soon: Vacation Time: What camera should you buy? Part II

Want to improve your photography, sign up for photography lessons

Friday, April 15, 2011

Lightning Photos: How'd I Do That?

Taking lightning photos is actually easy.  Unless you have super human lightning fast reflexes (no pun intended) it is almost impossible to catch a lightning strike by just point and shooting.
Here is what you need:
-A camera that you can set the shutter for a long exposure, Using the manual setting is good, one that has a Bulb setting is better.
-A tripod is a must!  Don't have a tripod, grab a bag of dried beans and find a solid surface.  Place your beans on the surface and then place your camera on the beans.
-If you have a remote for your camera, use it.
-A safe place- keep in mind your tripod is probably made out of metal so you are a good target if standing in an open field
-Flashlight
My equipment for these photos
Canon 5D Mark II, Tamaron f2/8 24-70mm, Manfrotto tripod
Patience!
Camera settings:
Shutter was set at 30 seconds, I could not find my remote, or I would of used the Bulb setting.  For those unfamiliar with the bulb setting, as long as you hold the shutter release button down, your shutter remains open.  Holding the button down with your hand for a long period of time will cause camera shake.
Since I was not using a remote I also set the camera timer for a 2 second delay, or else when I removed my hand after hitting the shutter button it was also cause camera shake.
ISO was set at 200, Since the shutter is open for such a long time, you are letting in alot of light.
Apeture was set at f/11
I use white balance on sunny, as I like the purple color I get.  If you want it redder changed it to cloudy.
I took these within a ten minute time period, one downfall of using the 30 second shutter setting vs the bulb setting is everytime the 30 second was over and the shutter closed  a perfect bolt of lightning covered the sky- Murphy;s Law I guess.  Since I was not able to use the bulb setting, in the last photo I combined some of the photos in Photoshop, just to see what it would look like- did this very quickly and it is not a very good photoshop example


For my safety, I set up on my back porch, which gave me cover and a good wind block. Wind can cause camera shake if your tripod isn't steady enough.
 Always consider your safety first.  

Want to learn more on photography, be sure to sign up for lessons.  Your vaction is just aound the corner- WOW your friends and create great memories with great photos!        

Tuesday, February 1, 2011

Blur the Background; How’d I do that?

Tips for beginners

Several of you have asked how I blur out the background in some of my photos. It’s a great way to make your subject standout for the background. I could get really technical, but will keep it simple.

Blurring the background is all about controlling your Depth of Field by using the aperture on your camera. If your camera has an aperture priority mode, this is the easiest way to achieve this. For cameras that do not have aperture priority, try using the portrait mode. Check you owner’s manual for the actual location, but the aperture mode is usually indicated by an Av, and portrait mode is usually a headshot profile silhouette.

The aperture is like the pupil of your eye and can increase and decrease in size. The size is indicated by f-stops. The smaller the f-stop the larger the aperture and the larger the f-stop the smaller the aperture. Confusing right, but there is a mathematical reason for that, but we won’t go in to that. The smallest aperture that most point and shoot cameras or cameras that come with kit lenses is f/3.5 which should work. If you want to improve the blur (or bokeh) you can find lenses that are as small as f/1.2 , but they can be quite pricey. To start out, you can get a nice f/1.8  for a very good price. The aperture also controls the amount of light that enters the camera, same as you pupil does in your eye.

Since I am trying to keep this simple, I will get back to how to blur the background. You must make the increase the aperture size. Unless you know how to put your camera on manual and adjust the shutter speed to concur with the aperture you have selective, I recommend using the aperture priority and let your camera’s internal light meter choose the shutter speed. Most of the time it gets it right, sometimes you may have to make some exposure adjustments to perfect it. The amount or quality of blurring can also depend on your camera’s sensor size, how close you are to the subject and lens.

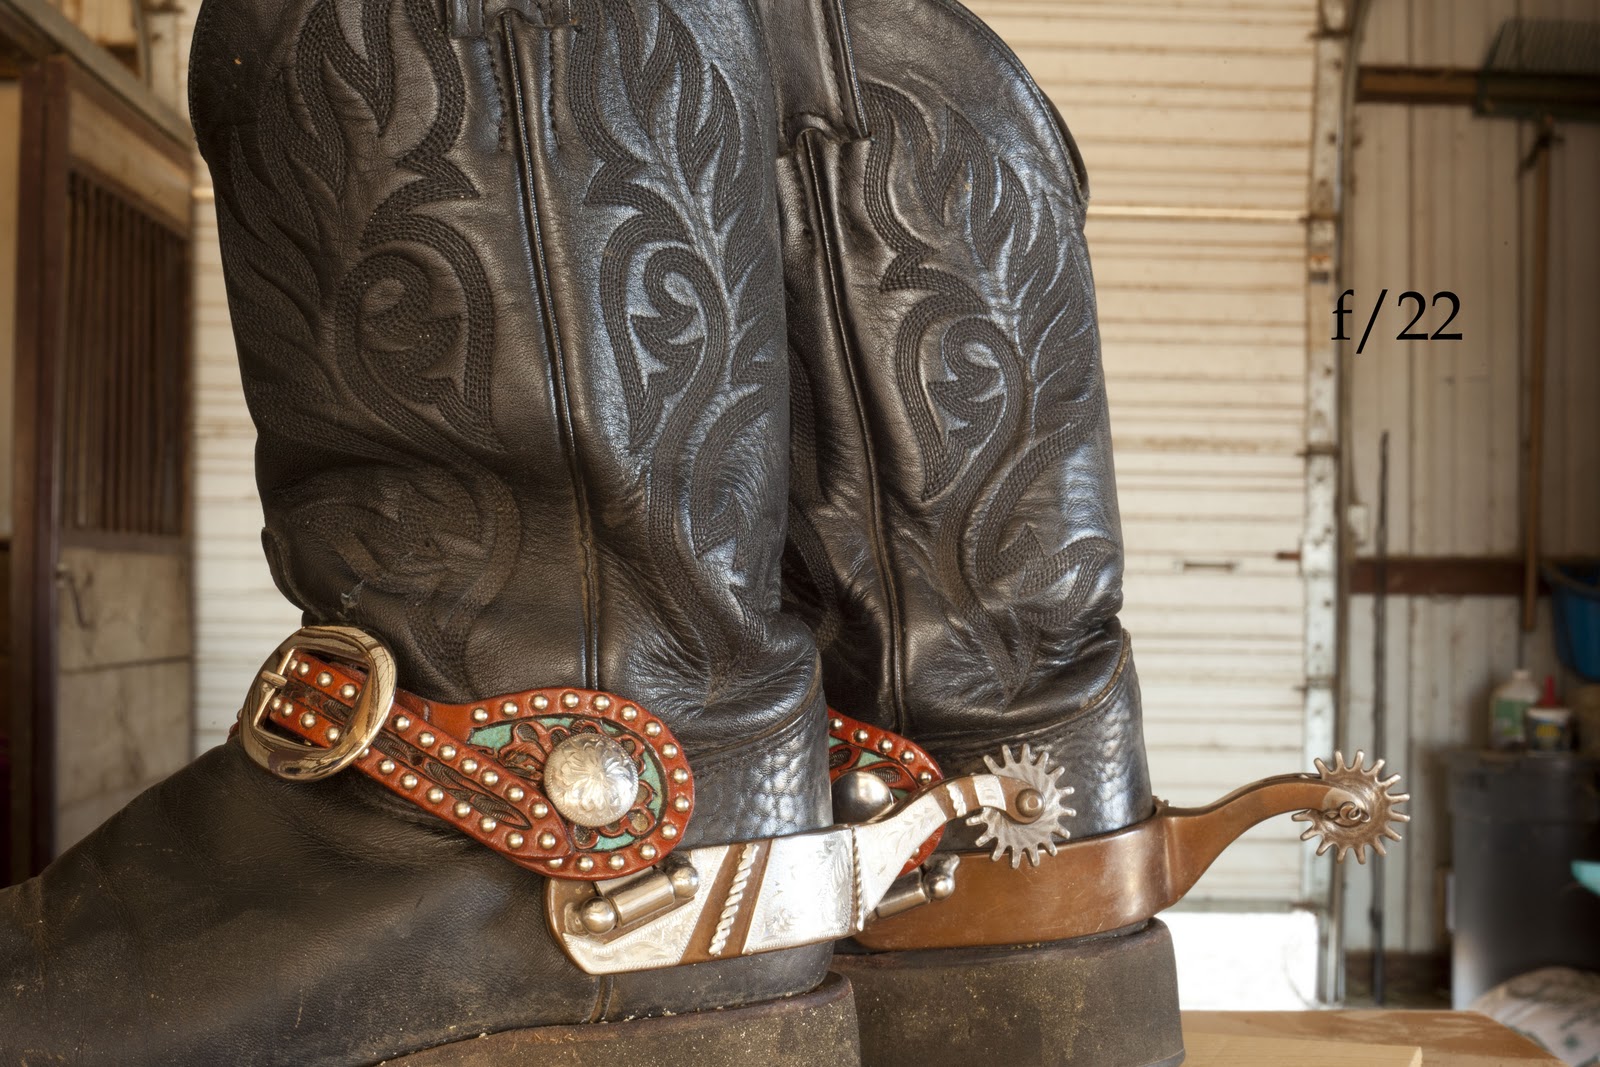
Below are some samples of the same subject. The first set is done with a 50mm prime lens and the 2nd set is done with a 70-200mm lens set at 200mm. Even though the 70-200mm lens is large and heavy, it is my favorite and use it a majority of the time. I took the 2 side photos with it.
Photos taken with 50mm lens
At f/1.8 the front boot is in focus the back boot, starts to loose focus.  I was ~5 ft away from the boot, the back wall is ~20 feet fromt he boots
At f/4 the back boot is almost in focus, the back wall still remains out of focus

At f/8 both boots are in focus and background is starting come into focus and looking cluttered


At f/22 almost everything is in focus and now you have a snapshot. Leaving you camera on auto would probably give the same results.


Photos taken with 70-200mm at 200mm


A telephoto lens helps blurr the background even more. At f/2.8 at 200mm background is very blurred


Even at f/32 at 200mm the backgroud is still slightly blurred

Want to learn more, be sure to sign up for photography lessons and learn to create your own great portraits.