Showing posts with label photography tips. Show all posts

Sunday, February 24, 2013

Preparing Your Horse For Photos

There are many reasons to have photos of your horse done and taking the time to prepare your horse will highly improve the quality of the images produced.

After you have decided on location and whether or not you will be in the photos, and have prepared yourself for the photos, spend enough time to have the horse prepared.  It's not just about the grooming; environment and even some training should be considered.

Have an idea of what type of images you are wanting or needing. Do you need some conformation images for advertising, or are you wanting some more personal images of the bond you share with your horse? What is the tone you are trying to set for your images: something more traditional and conservative, or something more dramatic?  Letting your photographer know your expectations is extremely important. Pinterest is an excellent site for creating some inspiration and getting some ideas. Share this with your photographer. I love it when the customer knows what they want, but still allows me to use my ideas, too.


To make your session with your horse less stressful, work with your horse before the session. If you are needing conformation photos, you will need to teach your horse "whoa" on the lead.  Horses are trained to follow us, so when we walk away to get out of the picture after getting the horse set-up perfectly, the horse will follow. A little work days/weeks before the session will help prevent them from doing so. Another thing to consider in conformation images is the profile.  Horses are trained to stand square for halter, but profile shots where the horse is standing square can give the appearance that the horse only has 2 legs (fig. 1). Teaching the horse to stand with some separation of the front and back legs (fig. 2) will look much better.  Know your horse's conformation flaws and best features; too much separation, or not enough, can make these points better or worse.

Fig. 1
Correct set-up for showing, but not
 suitable for photographs as it gives the horse the
appearance of having only 2 legs. 

Fig. 2
Correct set-up for conformation images.
You can see all 4 legs clearly.
Groom your horse as if you are attending a show.  If you are not sure what to do, there are plenty of grooming tips that can be found online.  A clean, clipped, and well-groomed horse photographs much better than an ill-prepared horse.  The camera picks up small details so dirt, stray hairs, and an un-clipped muzzle will really show up in your images. Spend a little more time on the head of the horse since the head will be shot in a closer frame. Dirt and debris around the muzzle, nostril, eyes, and ears should be cleaned well. Know the standards for clipping and grooming for your breed or discipline. Whether or not the mane should be braided, banded, kept long, or pulled are among the considerations. If you have the availability of keeping your horse's haircoat slick year-round, anytime of year is good for photos. If your horse is kept on pasture year-round, the best time for photos is spring when your horse has shed its long coat and before the coat dulls from the summer sun. In my opinion, this is when the horse's coat has the best color, luster, shine, and sometimes some dappling.

If your photo shoot is for a group of people at the same barn and the images are to be used for advertising, put someone in charge of coordinating the shoot. Having a cohesive look will greatly improve the look of your ads and photo groups. This can be in the details of grooming, tack,  and outfits. Grooming and tack should match the attire of the riders. You can even get as picky as having the same shades of leather. Outfit colors should coordinate with your horse as well as with others that will be included in the photo collection.

Another detail to consider is tack. Clean your tack before the shoot, even if it is just a quick wipe-down. I prefer leather tack in images. A brand new, bright nylon halter is very distracting and brings the focus of the image to the halter, not the horse.  With the exception of conformation shots, horses that are too young to be ridden, and halter horses, I think a bridle looks better and allows you more control.

Again, consult with your photographer: good communication can lead to the start of great results!

Monday, December 10, 2012

Appearance Tips For Your Photo Session

Taking extra time to think about your appearance for your photo session can make the difference between liking your images and loving them. Plan ahead and avoid that last minute rush of throwing something together at the last minute. I have a  few suggestions and tips to help you decide your clothing options below. These are not rules, just some observations I have made and some of my personal opinions. Some of the "don'ts" may work for you and your style!

Clothing

Women/Girls
  • Always keep in mind that the camera shows more!
  • Unless your arms are toned, you should wear sleeves that cover past the elbows.
  • Dresses should be long enough for you to sit down.
  • Undergarments may show through clothing in images, so layer if needed.
  • V-necks are more flattering, as it slims and lengthens the neck.
  • Avoid polo shirts; I find that they are not very flattering.

Men/Boys
  • I prefer the look of long sleeves on men in photos, but anything that is not too tight or too loose works.
  • Layering is always a good idea; it makes fast clothing changes for different looks.
  • Hint: If you are doing a session with your wife, mother, girlfriend, fiance; wear what they tell you to wear.


Families
  • Clothing that coordinates together is better than matching outfits! Pick a color and work around that.
  • If you are going to wear jeans, try to get tones that are close.
  • Accessories are awesome but add them to help coordinate, not to distract.
  • They even coordinated with the horses
  • If it is cold out, don't be afraid to wear coats and other accessories, but keep to the other suggestions.

All
  • Wear clothes that fit properly; too loose or too tight should be avoided.
  • The focus of these photos are you, not your clothes! So try to avoid too bright or dark of colors.
  • Avoid loud prints, lettering, logos, and bright shoes.
  • Avoid putting a dark belt on top of a light outfit.
  • Always think of head to toe and the location your shooting!
  • Always keep in mind your location, weather and the look you want.


Clothing changes
Layering: The jacket can be removed for a different
 look, and the hat can be removed for yet another look.
Think about where you are going to make clothing changes ahead of time. In some places, there are spots to go and in others, you are in the wide open, so think of undergarments!

Don't forget to bring shoes for all the outfits! Also think of where you're going to shoot and if its doable to wear your cute heels to get there, or if you should bring a practical  pair of shoes to walk to the location in. If shooting in a outdoor location,  I recommend a pair of rubber boots to wear when moving from place to place.  They are easy to take on and off and provide some protection.

Grooming
  • Men should be freshly shaved so five o'clock shadows don't show.
  • Hair should be nicely cut and colored. I recommend haircuts/color at least a week before.
  • Girls should have their eyebrows waxed/tweezed several days before so the redness isn't apparent.
  • Bring items for hair and make-up touch-up to your session!
  • Nails should be clean or manicured for everyone.  For girls, nail polish should be fresh or completely removed and not chipped.


Jewelry
Try to stay away from the pieces that "make your outfit a little cuter" and lean more toward the sentimental pieces. Chunky heavy jewelry may be cute, but it's very distracting and takes away from from the main subjects.

Make-up
Use matte finishes and avoid make-up with sparkles and glitter, as they get in the way in the retouching process with the way they reflect light. If you hire a make-up artist, use one that has worked with photographers.

Always feel free to contact me for a free consultation before your session. If you want to add a stylist, make-up artist, or hairstylist that is always an option for your session.

How many outfits?
Bring as many as you want and I will help you chose.  I have a lot of expereince with what photographs well and what colors look good with skin tones and the location we are working with.  Don't think you have to wear everything, we will make the best selections together so pack as much as you can.  I love accessories!

Monday, December 3, 2012

Choosing a smart location!

Location:
When going to take pictures you always want to have a location in mind! Location, location location!  Although I may know of a great location, it might be overdone and I also love trying out new places that clients suggestConsider the style you're looking for and what your interests are.  Think outside the box and try something that hasn't been done before.  Another thing to consider is the willingness to travel to a spot. You may know of a wonderful spot, but if you have to go under a bridge, through a creek, and a mile down the road to get to it, you should check to see if it's safe to carry all the equipment through. If you're not sure, look for another place. Feel free to consult me about the location you have in mind if you are not sure. Take into account that some places might be crowded and you may feel uncomfortable posing in front of many strangers, so keep in mind what which would be better for you: public or private locations?

As for how many people will be in your photos, a small venue would be perfect for a small amount of people, but always keep in mind that your shoot should take place in a location that has plenty of room to move and different choices for different looks.

Wanting something unique? Scout a fun location!  To give you an idea, laundromats have been popular, but that is being overdone in my opinion.  Never assume you can just show up to a place you found and use it for your shoots. Ask if it's on someone's property and make sure you have access before the shoot!  Some locations may have restrictions or require permits, and some may charge fees. In some cases, I can take care of the permits, but all fees are the client's responsibility.

Backgrounds:
Make sure clothing coincides with the background. For example, if you are wanting to shoot in a very green, woodsy area, it would be best to avoid wearing green. I am more than happy to help you with clothing suggestions. Another thing to consider is the condition of your background. You want it to look clean and avoid telephone poles/lines, or other things that can clog up your photo. If you have your home in mind, find a place free of clutter, inside and out. Watch out for the time of day you are going to take photos. Where will the sun will be? I will not photograph you directly facing a full sun! That would cause you to squint and cast a  harsh contrast on your face. I prefer the sun to be angled behind, to your side,  or possibly the front.

With your horses:
I prefer - though it is not required - to photograph horses where they are stabled or a place they are familiar with, as they usually act better!

Places with full sun and preferably lots of sky is best for taking images of just your horse, but for horse/person portraits, shade is preferred, though not required. It's usually best to take conformation shots of your horse on well-manicured grass or on another flat, clean surface with a clean background with a lot of sky and no distractions. For horse/human portraits, long grass and trees are great! Inside the barn works great, too, but just make sure it is clear of clutter. The location should allow plenty of range so we can shoot far away using the 200 mm lens. 


Weather:
I love cloudy days and even days with a slight drizzle, so please do not reschedule because of such conditions. When scheduling  always consider the weather and have a backup plan if rescheduling is not an option. If the weather plans for wind, does the location have a spot that would provide a good wind-block? In the summer, the morning is cooler and when we have very hot days, I will not do outdoor shoots any other time of day.  In the winter, mornings may be chilly, which I love, but dress accordingly.

Reminders
Remember you, your family, and your pets are the main characters of the shoot, and, in most cases, the background is not.  Depending on the number of subjects, I will not need much background to make a good image. The light source is more important sometimes.

Your Checklist Summary:
1) Location: style, travel, weather, clutter
2) Coordinating Clothing
3) Light
4) Background
5) Safety
6) Main subjects
7) Consult with your photographer

Sunday, July 22, 2012

Equine Photography Tips- What is White Balance?

Have you ever taken a photo in an indoor arena that had an awful yellow tint, or maybe took a photo at sunset, hoping to get some nice warm colors, but it looks blue? The reason for this is your camera cannot determine what white is - you need to tell it what white is. For certain lighting factors, we need to adjust our white balance.  White balance may also be referred to as color balance or color temperature.

I find most people shoot  on Auto White Balance (AWB).  In this setting the camera has to guess what white is and does not always get it right.  Camera models have different locations where you can adjust white balance, but you may have noticed several icons on your camera- light-bulb, sun, clouds and a few others. These represent different light sources and will tell your camera what white is, so you get proper colors. Some cameras have a K setting, which allows you to fine tune your white balance. Each of these represent the color temperature that the light source emits. 
I keep mine set at K, and will adjust as needed.


White Balance is measured in Kelvins - color temperature in light sources.
1000-2000K - Candlelight
2500-3500K - Tungsten Bulb (reg light bulb)
4000-5000K - Fluorescent Lamp
5000-5500K- Flash
5000-6000K- Sunny
6500-7500K - Cloudy/Overcast
8000-9000K - Shade/ Heavy Overcast

Adjustment scale in Lightroom


The lower temperature is the blue/cooler side of the scale and the higher temperatures are on the yellow/warmer side.

Taking a few moments to adjust your white balance will result in proper coloring of your image with more vividness and saturation.  You are also able to get a little more creative with your photography by adding a little more warmth or coolness to your images.

The images below are all the same, but they were shot in RAW format rather than jpg, so I was able to adjust in Adobe Lightroom easily to demonstrate how color temperature can effect your photos.


Taken just before sunset in heavy shade, but the sun was peaking through the trees to give a little rim light.  This is the 1st shot I took right after shooting with several flashes, so the the temperature was manually set at ~5200.   The white looks a little blue in these and no warmth in the photo.
Being sunset, the camera cannot detect white. If I had the camera set to AWB, it would have more than likely turned out looking like this - looking very blue without warmth.

With a little adjusting in Adobe Lightroom, we added some warmth.  After taking this photo, I remembered to adjust my  white balance  to ~ 7500K so they all would have the warm glow from the sun setting.

To learn more about white balance and other ways to improve your photography check out Terri Cage Photography's mentoring and lessons


Tuesday, April 10, 2012

Equine Photography: Its All About The Light Part II

As I mentioned in Part I early morning and late afternoon/early evening, just hours after sunrise and before sunset is the best times for creating beautiful images.  This time is also commonly known  as the Golden Hour because of the wonderful soft even light that can be found at this time. Photographing in the harsh mid-day sun can give unwanted shadowing hiding details and may over-exposed parts of your image and colors seem somewhat muted and hazy. Sunrise vs. Sunset is personal preference, but I like to photograph grey and black coat colorings in the morning, since the morning light has more pastels and blue tones. While red and gold tones are more prominent with the warmer tones at sunset. This is the normal with sunrises and sunset, but not the rule and you can never fully predict Mother Nature.

Learning to use the golden hour will greatly help improve the quality of your images, no matter what your subject is.  By positioning yourself in different angles from the sun, there is several different ways to use this light.  The following images are taken at different times of day from morning to dusk to give an idea of the use of light.

Taken early morning on a partly cloudy day.  Love the stillness of mornings! Sun was directly behind me.

Taken mid-day, lots of  distracting contrast and shadows that hide details and we have some overblown highlights and over exposed background.

Late afternoon light gives a soft light with some shadowing, which actually gives some depth to your subject, but doesn't over blow highlights or cause too much contrast that takes away details. Sun was behind me at a 45 degree angle. Look at the shadows for the suns direction.

Soft late afternoon early evening light gives even soft diffused light with even tones without harsh shadows or blown out whites. Sun was at my back at approximately a 45 degree angle.  You can see a soft shadow behind the horse to give an idea of the light direction

Taken 1 hour before sunset with the sun 45 degrees behind subject. Once again using the trees to diffuse the light slightly. The subject has a nice back-light giving a rim light effect, but still maintaining some of the details of the subject and having a small amount of sun-flare.  Also gave light to the insects in the image.


By putting your subject between the sun and yourself, you can create and nice silhouette, with a lot of sun-flare and rim-light around your subject. You may also get some very warm colors.  Shooting directly into the sun makes it difficult for your camera to focus, so you may need to resort to manual focus.  A very clean lens makes focusing easier.  The trees were used to diffuse the light and help in focusing.

Taken right after sunset giving a silouhette, with nice soft warm colors in the background,

Tuesday, March 27, 2012

Equine Photography: Its All About The Light Part I

Light is the most important aspect in equine photography, this is not limited to equine photography, but all photography.  After all in the Greek language photo means light, and graph means draw.  So when we take a photograph we are drawing with light.  So even if you never take your camera off auto, you can learn to use light to obtain the best possible  image with the knowledge you have on the use of light.

There is a reason photographers like to take photos in the early morning or late evening, commonly known as the golden hours.  The light is the best at these times and there are several reasons why. The sun is lower, so the ozone is thicker, so the light is softer, diffused and easier to control. Morning light usually has more pastel colors where the evening light has warmer tones. Scheduling a time to take photographs during these times is always a good plan, but what about those spontaneous photos. Here are a few tips.
Taken late morning late summer,
partly cloudy day.
See diagram below for setup

First off you must know were your light sources are coming from.  Where is the sun?  Is there anything reflective; sand, the side of a  building, water, a concrete driveway, you would be surprised where your light can come from. Where are the shadows?  The direction of the shadows will be your biggest indicator of your main light source.
Bright sunny days can always cause a problems especially mid-day when the sun is directly over head.  Dark shadows are everywhere and cannot be avoided.  If you are doing a portrait with a person and a horse, find some heavy shade.  It will soften the human subjects face and help prevent squinting. This is why cloudy days are the best for doing horse/human portraits.  If you are photography just horses, shade is not as important since horses really don't squint and the sun does help bring out the shine of the coat too. There are still shadows though.  The shadows I am talking about are not the ones that are cast on the ground, but the shadows on the actual body of the horse. The shape of the horse can cast shadows on the underline, under the bulging muscles and under the head and neck.  This can cause problems on dark horses and they can loose their definition. Put your back to the sun and the horse directly in front of you.  You will see the shadows, so position the horse were you can get minimal shadows, being mid-day you will get shadows regardless. This is where finding other light sources help, try to find reflective surfaces we spoke of earlier.  Use a concrete pathway or driveway to reflect light to the underside of the horse- a bright side of a building can help also. Some of the shadows will still be there, but not as evident. The difficult part is get everything, especially the horse, into position and still keeping a clean attractive background.

Learning to use your available light to your advantage can be a big help in getting better images with what you have on hand. I do suggest to learn more about photography and learn the functions of your camera to improve your skills even more.

Subscribe to this blog to follow more in the series of using light.


Wednesday, February 29, 2012

Equine Photography Tips: Get Those Ears Up!

I recently sent out a newsletter that had one short equine photography tip.  Although it was a short statement, it described the most important action to get a good equine portrait: "get those ears up." I believe it is extremely important as it changes the whole attitude and expression in the horse's face. The eyes brighten, the face tightens, nostrils flare, and the horse look alive.  Look at the difference (ignore the loose fitting halter):


I got several inquiries on how I get horses' ears up. There are several different methods I use, depending on the environment and the horse.  Older, laid-back horses can be the most difficult and I really haven't determined any breed, age, or gender that is the easiest.  I use all sorts of treats, squeaky toys, and most importantly, a helper (or 2).  One of my favorites is a pool noodle; I find it easier to use than a broom or rake.  I use it in several ways. It makes an interesting noise when shaken and it is long enough to touch a horse's nose and quickly draw it away, so it is not in the photo.  I also have used the hole at the end to add a pom pom or plastic bag.
Some of the devices I use when I have no helper is squeaky toys (either one designed for babies or dogs, either works). It is hard to work a camera and squeeze the toy at the same time.  Since I wasn't blessed with  three arms, I put it on the ground and use my foot.

Now my favorite and most-used is actually the cheapest and always with me.  I carry it on my phone, so if you are like me, you are lost without it. I use an app called Horse Shaker Deluxe, which makes real whinny noises.  Now I don't have to make my own noises and get those strange looks.  Sometimes it works too well and the horse might get a little uncontrollable while trying to figure out where it is coming from.  I love it when the horse's owner looks around to see where it is coming from; it's that real sounding.
When using these items, never show them to the horse until you are ready to take a shot.  Horses get bored easily so if you show it to the horse before they are ready, they already lost interest.


Thursday, January 19, 2012

How to Help your Horse Show Photographer

Horse Show Photography can be hard work and with more equine photographers no longer providing services to equine events it may be hard to find a true equine photographer to come to your event.  Why? Most can be explained in this excellent article by Shawn McMillen - Horse Show Photographers Are Facing a Crisis. It explains the reasons for the lack of photographers at events, mainly due to the cost of doing business and the abundant copyright theft.  He was also cheered and jeered in the comments. Most jeers were for the cost of images and prints, so I wonder if they really read the article. Many of the cheers were from fellow photographers or honest customers. As a show manager copyright infringement is out of your control.  You can help deter or report it, educate others, but you can't prevent it.  So what other ways can you keep your photographer to come back?

When I  photograph an event as the official photographer, I make every attempt to photograph every horse. If I did not get a horse, it is usually because the class was large and too short. Of course there other reasons, as needing to do some camera maintenance and an occasional short break.  We work tirelessly, the days can be long and the elements can be unforgiving. In most cases we do not get paid for our time, only for the images we sell.  So when I see numerous others with cameras at events, it can get a little discouraging.  I have no problem with those photographing family members and friends, but those that take photos of almost everyone is different story. What is even more annoying is when they find a place close to you and using the high speed shutter of their camera click, click, click away.  I find it extremely distracting when I am trying to time my shots to get the best image and most appealing placement of the horse's stride.  I was recently photographing a show and because of the nature of the show was ask not to be in the arena and photograph from the stands. No problem, it makes it a little more difficult during rail classes, but doable. Since I am in the stands, I try not to block the spectators view.  At this show, another photographer would stand right above me and click click click. Not only was it distracting for me, but they blocked every one's view behind me which in my opinion was rude.  I stay quiet and out of the way, so many may not even know I was there. As I have always said, the main purpose of a show is to compete and for others to watch. Photographs are just something extra.

I have photographed many equestrian events of several different disciplines. Some of them I was asked to be the photographer, others I asked if one was needed. Some of the show manager are great and almost treated me like royalty, but others I can't even the time of day.  Giving me the royal treatment really isn't necessary, but not I really don't like to be cast aside. Either way, we both have the same end  goal which is a successful day.  Letting the exhibitors know where their photos can be seen and purchased is part of the success for both of us. Having professional photographs done at your event gives it an extra special touch and your exhibitors really appreciate it, but if they can't find them it doesn't help anyone.  So if I can't get the info I need or my info isn't made available to the exhibitors, it isn't worth the time to photograph the event.

Trying not to turn this into one big complaint, so will get back to the main purpose of this post.
How can you help your show photographer?  Here are my top ten suggestions.
Before the show
1. List the photographer on your show bill and other marketing pieces. Helps the show and the photographer-see above.
2. Add the photographer to the show website, facebook page and other web-base listings with their link.
3. Give a list of exhibitors name and numbers, ride times and so forth so they can easily identify exhibitors . Some photographers will separate classes or exhibitors into galleries for easy viewing.
4. Provide them with show schedule, classes and if applicable patterns. This will help them plan their day and having patterns will help them find the best spot for the best image.
5. Let them know were they can and cannot go or if you prefer them only use available light and not use flash or strobes.
During the show
6. Announce that there is an official photographer taking photos, Many times when this is announced several will come up to me and make sure I take photos of them or someone else. They also tell me they didn't know I was there until it was announced
7. Offer a place for the photographer to set up a table if needed or get business cards ahead of time and include in registration packets. They may also want a safe place to keep equipment.
8. Inform them of any unlisted breaks or changes in the schedule. That way they know when it is a good time for them to grab some candids, get a requested portrait shot or even take a break.
9. If you see someone else soliciting photos, kindly ask them not to. If they not stop, ask them for a copy of their business liability insurance and tell them it is require to take photos. That should do the trick.
After the show
10. Provide the photographer with email addresses so they can notify them where to find images. Show management can send also this out.  Be sure to copy the photographer when you sent it out, so they know it has been done.

Thursday, June 2, 2011

Vacation Time: What camera should you buy? Part II

In the Part I five basic points were suggested in considering a camera to purchase for your vacation. Price, camera size. brand, ease of use and your subject matter. Price and brand were covered pretty much as needs to be. Just a few things to touch on.
Taken With a Sony a350


As with the price, if you think you might use your new camera in more situations after your vacation, then you might want to budget more. Do have children in you near future, nieces, nephews, yours, friends? Have you recently retired, looking for a new hobby or are you planning on traveling more in the future? Photography can be addicting. Don’t forget to budget for batteries, memory cards and camera case.

Taken with a Canon 5D MKII
A little more on camera size. Think about the nature of your vacation. Are you doing a lot of sight-seeing, shopping, camping, hiking or taking a cruise? Are you going to be in high populated areas, large crowds? Are you going to want to keep up with a large camera case? If you really want to capture your memories, you should be more willing want lug it around. Never fails when you don’t bring it, there is always a perfect photo op that you just missed.
Taken With Panasonic DMC-FZ7
Are you technically challenged, never read the manual and toss it aside or do read it cover to cover. This is where ease of use needs to be brought up. A good hint for the finding the technicality of a camera is to look at the manual before you buy. How many pages and will you read them. The thicker the manual than more frustrating it may be for someone who in a non-manual reader. Most stores won’t let you open up the box just to see the manual. But if they have a display camera, they should have a manual. If not locate the manual on-line. The more the technical a camera, in most cases the higher the price. In my opinion, if you are going to only going to shoot on auto, opt for the less expensive point and shoot rather than the DSLR.

Taken with a Sony a350
Next point to keep in mind if what will be the majority of you subject matter. Scenery, architecture, indoor, low light situation, action or even underwater. Will you be in damp or wet areas or dry and dusty. There are plenty of cameras that are marketed for certain types of situations and there are plenty that work in most. Some of the features on cameras will increase the price of the camera, so it is a feature you won’t need or want you may want to look at a few more cameras. Once again I want to remind you to check the photography restrictions on the places you want to visit.

I would  be glad you help you find a good camera to fit your needs and once you get your camera, be sure to sign up for photography lessons. If you decide that it is too much hassle to take photos, bring me along as your own personal vacation photographer and photojournalist (wink wink).

Check out these articles on popular vacation spots for photography

The attached photos were taken with:
Canon 5D Mark II  This is a great camera, but is expensive and large. Unless you are very serious about photography it alot to keep up with while on vacation.
Panasonic DMC-FZ7  Have had this camera for 6 years and it has held up great.  It is now my daughter's camera and she really enjoyes it.  Not recommended for low light.  Has a high zoom capapilites, but as with any digital zoom you loose image quality.
Sony a350 Had a lot of fun with this DSLR, was pretty easy to carry around too.

Other camera's linked on this page are just to show examples, not recommending or saying they are inferior to other similiar prodeucts.
Camera reviews DP Review 

Camera retailers
BH Photo
Adorama
Don't forget to get plenty of memory for the extend of your vaction if you are unable to upload images to another source until you return home.

Tuesday, May 31, 2011

Vacation Time: What camera should you buy? Part I

It is getting close for summer vacations and I know last year I was asked by many on what type of camera they should buy. There are 100’s even 1000’s of models of cameras so there is one to fit your needs. If you do your homework you shouldn’t be disappointed in the one you buy. If  buy the 1st one you see on sale, you might me unsatisfied.

Here is a good checklist to develop a starting point.
Price

Size

Brand

Ease of use

Subject matter

Price is always the first thing I ask, it gives a great starting point on where they should look. I do encourage everyone to spend just a little more than they budgeted for. Cut your vacation budget somewhere else and opt for a higher quality camera. That expensive dinner will be with you for only so long. The photos you take will last a lifetime. Of course you can always take a photo of your dinner with a camera.

Size of the camera and accessories is the next question. Do you want something that will fit in your pocket or purse or are you willing to carry a full camera bag/backpack? It also brings up another thing to consider, is the place you are going; what is the danger of theft. You don’t want to make yourself a target, as some areas see you as someone with money if you have a big expensive camera. Plus the camera itself is a target.

Brand of the cameras you are familiar with or may currently own is another question. If you already own brand X and it is highly rated, I suggest you stay with it. The reason being is you may already own accessories that will work with your current brand. Also many of the settings, button, knobs and so forth may be similar making it easier for you to use and understand.

Ease of use is important to know in case you have a good understanding of camera functions and settings or you are one of those who leave it on “Auto” all the time. Leaving it on Auto is perfectly fine; I think a majority of people do. If you are an “auto” person and I am sure not going to have you spend the extra money for a camera that has all the bells and whistles.

Knowing Subject matter is important to know what features you will need. Are you planning on taking a lot of indoor photos with low light and no flash is allowed or a bunch of landscapes. Are you the type that takes only scenery photos or do you put your friends and family in the photo too?

Warning: Do your research on where you are visiting and if they allow photos at certain venues. Don’t spend tons on a camera/lens that can take good low light photos just to find out they do not allow cameras in the building.

Coming soon: Vacation Time: What camera should you buy? Part II

Want to improve your photography, sign up for photography lessons

Friday, April 15, 2011

Lightning Photos: How'd I Do That?

Taking lightning photos is actually easy.  Unless you have super human lightning fast reflexes (no pun intended) it is almost impossible to catch a lightning strike by just point and shooting.
Here is what you need:
-A camera that you can set the shutter for a long exposure, Using the manual setting is good, one that has a Bulb setting is better.
-A tripod is a must!  Don't have a tripod, grab a bag of dried beans and find a solid surface.  Place your beans on the surface and then place your camera on the beans.
-If you have a remote for your camera, use it.
-A safe place- keep in mind your tripod is probably made out of metal so you are a good target if standing in an open field
-Flashlight
My equipment for these photos
Canon 5D Mark II, Tamaron f2/8 24-70mm, Manfrotto tripod
Patience!
Camera settings:
Shutter was set at 30 seconds, I could not find my remote, or I would of used the Bulb setting.  For those unfamiliar with the bulb setting, as long as you hold the shutter release button down, your shutter remains open.  Holding the button down with your hand for a long period of time will cause camera shake.
Since I was not using a remote I also set the camera timer for a 2 second delay, or else when I removed my hand after hitting the shutter button it was also cause camera shake.
ISO was set at 200, Since the shutter is open for such a long time, you are letting in alot of light.
Apeture was set at f/11
I use white balance on sunny, as I like the purple color I get.  If you want it redder changed it to cloudy.
I took these within a ten minute time period, one downfall of using the 30 second shutter setting vs the bulb setting is everytime the 30 second was over and the shutter closed  a perfect bolt of lightning covered the sky- Murphy;s Law I guess.  Since I was not able to use the bulb setting, in the last photo I combined some of the photos in Photoshop, just to see what it would look like- did this very quickly and it is not a very good photoshop example


For my safety, I set up on my back porch, which gave me cover and a good wind block. Wind can cause camera shake if your tripod isn't steady enough.
 Always consider your safety first.  

Want to learn more on photography, be sure to sign up for lessons.  Your vaction is just aound the corner- WOW your friends and create great memories with great photos!        

Tuesday, February 1, 2011

Blur the Background; How’d I do that?

Tips for beginners

Several of you have asked how I blur out the background in some of my photos. It’s a great way to make your subject standout for the background. I could get really technical, but will keep it simple.

Blurring the background is all about controlling your Depth of Field by using the aperture on your camera. If your camera has an aperture priority mode, this is the easiest way to achieve this. For cameras that do not have aperture priority, try using the portrait mode. Check you owner’s manual for the actual location, but the aperture mode is usually indicated by an Av, and portrait mode is usually a headshot profile silhouette.

The aperture is like the pupil of your eye and can increase and decrease in size. The size is indicated by f-stops. The smaller the f-stop the larger the aperture and the larger the f-stop the smaller the aperture. Confusing right, but there is a mathematical reason for that, but we won’t go in to that. The smallest aperture that most point and shoot cameras or cameras that come with kit lenses is f/3.5 which should work. If you want to improve the blur (or bokeh) you can find lenses that are as small as f/1.2 , but they can be quite pricey. To start out, you can get a nice f/1.8  for a very good price. The aperture also controls the amount of light that enters the camera, same as you pupil does in your eye.

Since I am trying to keep this simple, I will get back to how to blur the background. You must make the increase the aperture size. Unless you know how to put your camera on manual and adjust the shutter speed to concur with the aperture you have selective, I recommend using the aperture priority and let your camera’s internal light meter choose the shutter speed. Most of the time it gets it right, sometimes you may have to make some exposure adjustments to perfect it. The amount or quality of blurring can also depend on your camera’s sensor size, how close you are to the subject and lens.

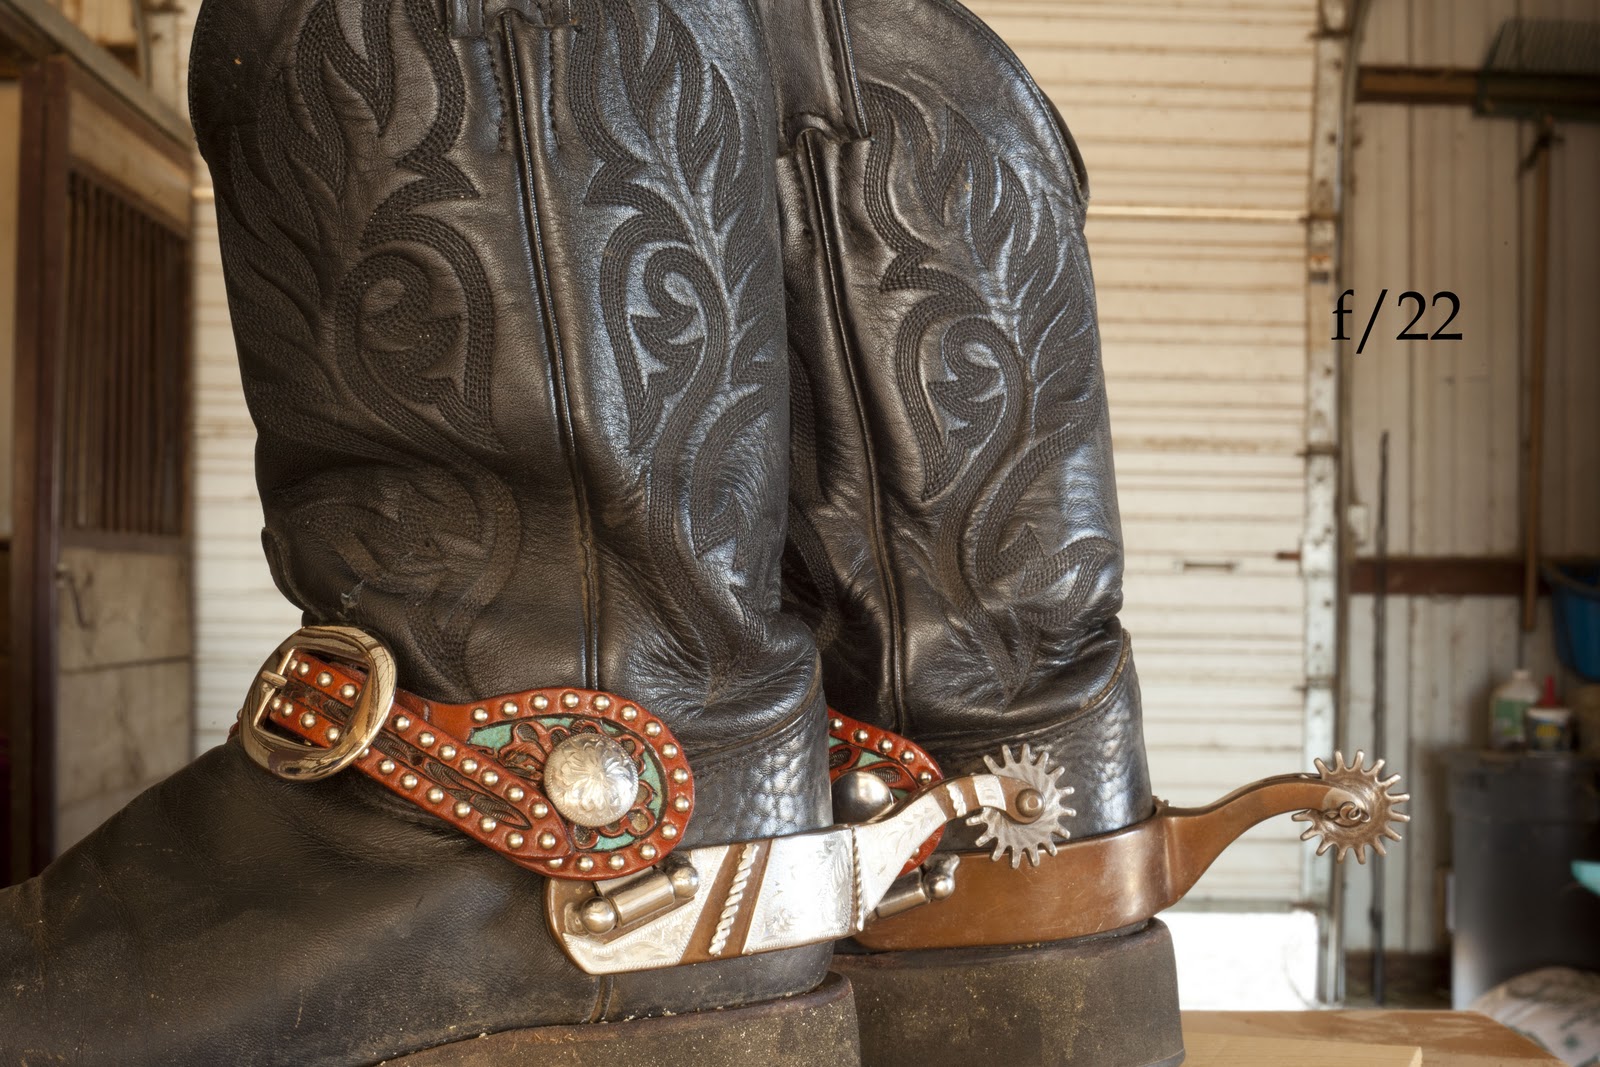
Below are some samples of the same subject. The first set is done with a 50mm prime lens and the 2nd set is done with a 70-200mm lens set at 200mm. Even though the 70-200mm lens is large and heavy, it is my favorite and use it a majority of the time. I took the 2 side photos with it.
Photos taken with 50mm lens
At f/1.8 the front boot is in focus the back boot, starts to loose focus.  I was ~5 ft away from the boot, the back wall is ~20 feet fromt he boots
At f/4 the back boot is almost in focus, the back wall still remains out of focus

At f/8 both boots are in focus and background is starting come into focus and looking cluttered


At f/22 almost everything is in focus and now you have a snapshot. Leaving you camera on auto would probably give the same results.


Photos taken with 70-200mm at 200mm


A telephoto lens helps blurr the background even more. At f/2.8 at 200mm background is very blurred


Even at f/32 at 200mm the backgroud is still slightly blurred

Want to learn more, be sure to sign up for photography lessons and learn to create your own great portraits.