Sunday, July 22, 2012

Equine Photography Tips- What is White Balance?

Have you ever taken a photo in an indoor arena that had an awful yellow tint, or maybe took a photo at sunset, hoping to get some nice warm colors, but it looks blue? The reason for this is your camera cannot determine what white is - you need to tell it what white is. For certain lighting factors, we need to adjust our white balance.  White balance may also be referred to as color balance or color temperature.

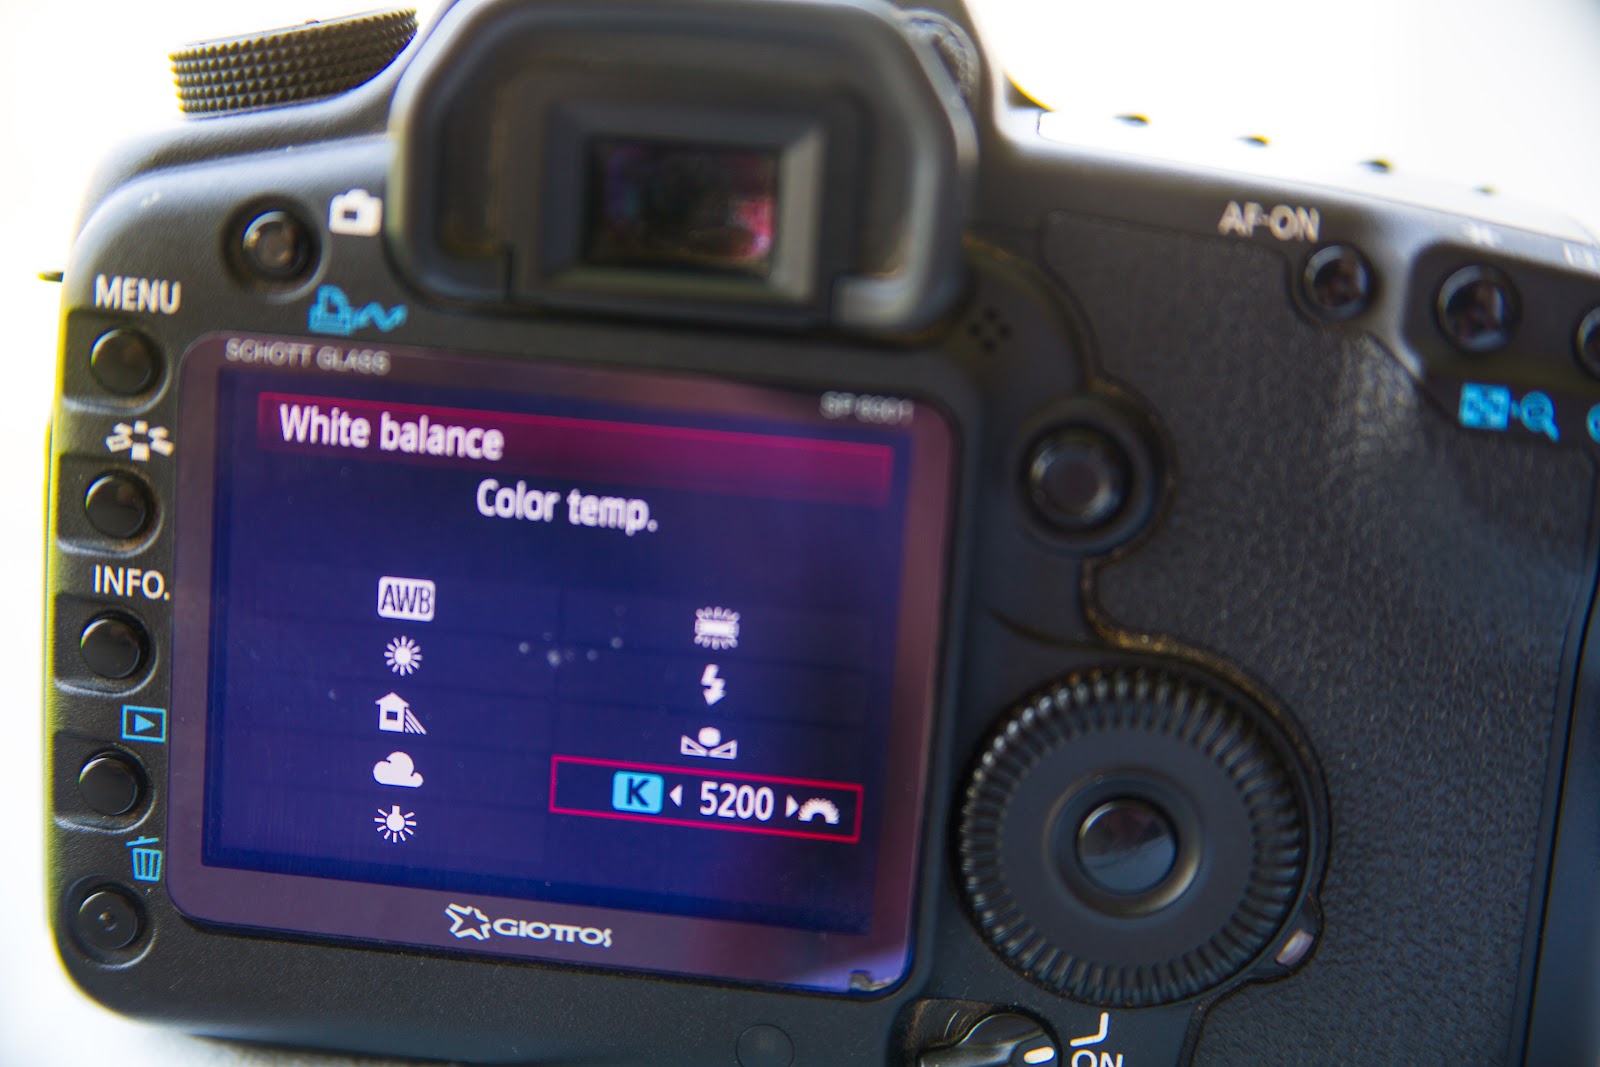
I find most people shoot  on Auto White Balance (AWB).  In this setting the camera has to guess what white is and does not always get it right.  Camera models have different locations where you can adjust white balance, but you may have noticed several icons on your camera- light-bulb, sun, clouds and a few others. These represent different light sources and will tell your camera what white is, so you get proper colors. Some cameras have a K setting, which allows you to fine tune your white balance. Each of these represent the color temperature that the light source emits. 
I keep mine set at K, and will adjust as needed.


White Balance is measured in Kelvins - color temperature in light sources.
1000-2000K - Candlelight
2500-3500K - Tungsten Bulb (reg light bulb)
4000-5000K - Fluorescent Lamp
5000-5500K- Flash
5000-6000K- Sunny
6500-7500K - Cloudy/Overcast
8000-9000K - Shade/ Heavy Overcast

Adjustment scale in Lightroom


The lower temperature is the blue/cooler side of the scale and the higher temperatures are on the yellow/warmer side.

Taking a few moments to adjust your white balance will result in proper coloring of your image with more vividness and saturation.  You are also able to get a little more creative with your photography by adding a little more warmth or coolness to your images.

The images below are all the same, but they were shot in RAW format rather than jpg, so I was able to adjust in Adobe Lightroom easily to demonstrate how color temperature can effect your photos.


Taken just before sunset in heavy shade, but the sun was peaking through the trees to give a little rim light.  This is the 1st shot I took right after shooting with several flashes, so the the temperature was manually set at ~5200.   The white looks a little blue in these and no warmth in the photo.
Being sunset, the camera cannot detect white. If I had the camera set to AWB, it would have more than likely turned out looking like this - looking very blue without warmth.

With a little adjusting in Adobe Lightroom, we added some warmth.  After taking this photo, I remembered to adjust my  white balance  to ~ 7500K so they all would have the warm glow from the sun setting.

To learn more about white balance and other ways to improve your photography check out Terri Cage Photography's mentoring and lessons


Tuesday, April 24, 2012

Wanted: Senior Reps for 2013


Now is the time to sign up to be a Senior Rep for Terri Cage Photography for the all upcoming 2013 Seniors!

What is a Senior Rep?  They are an outgoing, super energetic with an upbeat attitude who loves to be in front of the camera. You will have your senior photo session done early in their senior year, preferably before their senior year starts. We can even do it now when it is green and before the hot Texas summer sets in.
We do a 2+ hour session at no charge with as many fashion changes as you wish at a location of your choice or one of my favorites. You may bring props parents or your 2 or 4 legged friend.

What you have to do? As a Terri Cage Photography Senior Rep, you represent me and the images I have taken of you.  Show them to your friends, handout my cards and be excited about your photos.

iPhone Album App- Opens to a slide show!!
What's in it for you? Besides getting your free session you will also get a free iPhone app photo gallery. Don't have an iPhone or iPad, most phones that takes apps will work. You may also get a "look book" watermarked images to show to your friends. Don't worry the watermark won't take away from your photos. A free on-line gallery of your photos to choose your favorites from.  You will get up to10 digital images with a watermark to post on Facebook and a great collage for your Facebook cover photo. Great discounts on images or prints. Plus commissions and bonus images for everyone you refer that has photos done with Terri Cage Photography.

What is require besides your outgoing personality?
1.You must post consistently on Facebook and agree to keep a profile and/or cover photo taken by me throughout the year.  Since you will have other milestone images that you what to display as your cover or profile, that is fine as long as one Terri Cage Photography image remain.
2. You should be active at school and other activities.
3. You must love to have your photo taken!

How do you sign up?  Send an e-mail to tcage1@earthlink,net with the following information:
Name, school, and why you want to be a Senior Rep and what makes you stand out.

Be sure to to put TCP 2012 REP in the subject line. Hurry and sign-up, reps are limited to 1 or 2 per school and only 10 total.  Any schools in Denton, Collin, Cooke, Wise, Tarrant, are eligible, surrounding counties will be considered.

Tuesday, April 10, 2012

Equine Photography: Its All About The Light Part II

As I mentioned in Part I early morning and late afternoon/early evening, just hours after sunrise and before sunset is the best times for creating beautiful images.  This time is also commonly known  as the Golden Hour because of the wonderful soft even light that can be found at this time. Photographing in the harsh mid-day sun can give unwanted shadowing hiding details and may over-exposed parts of your image and colors seem somewhat muted and hazy. Sunrise vs. Sunset is personal preference, but I like to photograph grey and black coat colorings in the morning, since the morning light has more pastels and blue tones. While red and gold tones are more prominent with the warmer tones at sunset. This is the normal with sunrises and sunset, but not the rule and you can never fully predict Mother Nature.

Learning to use the golden hour will greatly help improve the quality of your images, no matter what your subject is.  By positioning yourself in different angles from the sun, there is several different ways to use this light.  The following images are taken at different times of day from morning to dusk to give an idea of the use of light.

Taken early morning on a partly cloudy day.  Love the stillness of mornings! Sun was directly behind me.

Taken mid-day, lots of  distracting contrast and shadows that hide details and we have some overblown highlights and over exposed background.

Late afternoon light gives a soft light with some shadowing, which actually gives some depth to your subject, but doesn't over blow highlights or cause too much contrast that takes away details. Sun was behind me at a 45 degree angle. Look at the shadows for the suns direction.

Soft late afternoon early evening light gives even soft diffused light with even tones without harsh shadows or blown out whites. Sun was at my back at approximately a 45 degree angle.  You can see a soft shadow behind the horse to give an idea of the light direction

Taken 1 hour before sunset with the sun 45 degrees behind subject. Once again using the trees to diffuse the light slightly. The subject has a nice back-light giving a rim light effect, but still maintaining some of the details of the subject and having a small amount of sun-flare.  Also gave light to the insects in the image.


By putting your subject between the sun and yourself, you can create and nice silhouette, with a lot of sun-flare and rim-light around your subject. You may also get some very warm colors.  Shooting directly into the sun makes it difficult for your camera to focus, so you may need to resort to manual focus.  A very clean lens makes focusing easier.  The trees were used to diffuse the light and help in focusing.

Taken right after sunset giving a silouhette, with nice soft warm colors in the background,

Tuesday, March 27, 2012

Equine Photography: Its All About The Light Part I

Light is the most important aspect in equine photography, this is not limited to equine photography, but all photography.  After all in the Greek language photo means light, and graph means draw.  So when we take a photograph we are drawing with light.  So even if you never take your camera off auto, you can learn to use light to obtain the best possible  image with the knowledge you have on the use of light.

There is a reason photographers like to take photos in the early morning or late evening, commonly known as the golden hours.  The light is the best at these times and there are several reasons why. The sun is lower, so the ozone is thicker, so the light is softer, diffused and easier to control. Morning light usually has more pastel colors where the evening light has warmer tones. Scheduling a time to take photographs during these times is always a good plan, but what about those spontaneous photos. Here are a few tips.
Taken late morning late summer,
partly cloudy day.
See diagram below for setup

First off you must know were your light sources are coming from.  Where is the sun?  Is there anything reflective; sand, the side of a  building, water, a concrete driveway, you would be surprised where your light can come from. Where are the shadows?  The direction of the shadows will be your biggest indicator of your main light source.
Bright sunny days can always cause a problems especially mid-day when the sun is directly over head.  Dark shadows are everywhere and cannot be avoided.  If you are doing a portrait with a person and a horse, find some heavy shade.  It will soften the human subjects face and help prevent squinting. This is why cloudy days are the best for doing horse/human portraits.  If you are photography just horses, shade is not as important since horses really don't squint and the sun does help bring out the shine of the coat too. There are still shadows though.  The shadows I am talking about are not the ones that are cast on the ground, but the shadows on the actual body of the horse. The shape of the horse can cast shadows on the underline, under the bulging muscles and under the head and neck.  This can cause problems on dark horses and they can loose their definition. Put your back to the sun and the horse directly in front of you.  You will see the shadows, so position the horse were you can get minimal shadows, being mid-day you will get shadows regardless. This is where finding other light sources help, try to find reflective surfaces we spoke of earlier.  Use a concrete pathway or driveway to reflect light to the underside of the horse- a bright side of a building can help also. Some of the shadows will still be there, but not as evident. The difficult part is get everything, especially the horse, into position and still keeping a clean attractive background.

Learning to use your available light to your advantage can be a big help in getting better images with what you have on hand. I do suggest to learn more about photography and learn the functions of your camera to improve your skills even more.

Subscribe to this blog to follow more in the series of using light.


Friday, March 2, 2012

Terri Cage Photography Giveaway

Just in time for spring.
It is already the beginning of March, and Spring is right around the corner.  Horses are shedding, flowers are blooming and trees will soon be getting leaves.

In honor of the warmer weather, I am running a contest for a $100 Gift Certificate. The lucky winner is free to use it on prints, digital images, photo sessions or lessons. Prints can be purchase from previous events, sessions or fine art prints. Gift Certificate may not be used on shipping, travel expenses or anything from the SmugMug merchandise tab.

Who should enter?  Everyone! Class of 2012 Seniors still needing their portraits, perfect for a Mother's Day present,  a bluebonnet photo session, you and your favorite horse. Get the horse show photos you keep putting off ordering. You always wanted to purchase a large canvas print or photo on metal.  Vacation time is around the corner, take some lessons and get some fabulous images.
So how do you win?  Earn your chances by filling out the Rafflecopter below.  Good Luck!
a Rafflecopter giveaway

Wednesday, February 29, 2012

Equine Photography Tips: Get Those Ears Up!

I recently sent out a newsletter that had one short equine photography tip.  Although it was a short statement, it described the most important action to get a good equine portrait: "get those ears up." I believe it is extremely important as it changes the whole attitude and expression in the horse's face. The eyes brighten, the face tightens, nostrils flare, and the horse look alive.  Look at the difference (ignore the loose fitting halter):


I got several inquiries on how I get horses' ears up. There are several different methods I use, depending on the environment and the horse.  Older, laid-back horses can be the most difficult and I really haven't determined any breed, age, or gender that is the easiest.  I use all sorts of treats, squeaky toys, and most importantly, a helper (or 2).  One of my favorites is a pool noodle; I find it easier to use than a broom or rake.  I use it in several ways. It makes an interesting noise when shaken and it is long enough to touch a horse's nose and quickly draw it away, so it is not in the photo.  I also have used the hole at the end to add a pom pom or plastic bag.
Some of the devices I use when I have no helper is squeaky toys (either one designed for babies or dogs, either works). It is hard to work a camera and squeeze the toy at the same time.  Since I wasn't blessed with  three arms, I put it on the ground and use my foot.

Now my favorite and most-used is actually the cheapest and always with me.  I carry it on my phone, so if you are like me, you are lost without it. I use an app called Horse Shaker Deluxe, which makes real whinny noises.  Now I don't have to make my own noises and get those strange looks.  Sometimes it works too well and the horse might get a little uncontrollable while trying to figure out where it is coming from.  I love it when the horse's owner looks around to see where it is coming from; it's that real sounding.
When using these items, never show them to the horse until you are ready to take a shot.  Horses get bored easily so if you show it to the horse before they are ready, they already lost interest.


Thursday, January 19, 2012

How to Help your Horse Show Photographer

Horse Show Photography can be hard work and with more equine photographers no longer providing services to equine events it may be hard to find a true equine photographer to come to your event.  Why? Most can be explained in this excellent article by Shawn McMillen - Horse Show Photographers Are Facing a Crisis. It explains the reasons for the lack of photographers at events, mainly due to the cost of doing business and the abundant copyright theft.  He was also cheered and jeered in the comments. Most jeers were for the cost of images and prints, so I wonder if they really read the article. Many of the cheers were from fellow photographers or honest customers. As a show manager copyright infringement is out of your control.  You can help deter or report it, educate others, but you can't prevent it.  So what other ways can you keep your photographer to come back?

When I  photograph an event as the official photographer, I make every attempt to photograph every horse. If I did not get a horse, it is usually because the class was large and too short. Of course there other reasons, as needing to do some camera maintenance and an occasional short break.  We work tirelessly, the days can be long and the elements can be unforgiving. In most cases we do not get paid for our time, only for the images we sell.  So when I see numerous others with cameras at events, it can get a little discouraging.  I have no problem with those photographing family members and friends, but those that take photos of almost everyone is different story. What is even more annoying is when they find a place close to you and using the high speed shutter of their camera click, click, click away.  I find it extremely distracting when I am trying to time my shots to get the best image and most appealing placement of the horse's stride.  I was recently photographing a show and because of the nature of the show was ask not to be in the arena and photograph from the stands. No problem, it makes it a little more difficult during rail classes, but doable. Since I am in the stands, I try not to block the spectators view.  At this show, another photographer would stand right above me and click click click. Not only was it distracting for me, but they blocked every one's view behind me which in my opinion was rude.  I stay quiet and out of the way, so many may not even know I was there. As I have always said, the main purpose of a show is to compete and for others to watch. Photographs are just something extra.

I have photographed many equestrian events of several different disciplines. Some of them I was asked to be the photographer, others I asked if one was needed. Some of the show manager are great and almost treated me like royalty, but others I can't even the time of day.  Giving me the royal treatment really isn't necessary, but not I really don't like to be cast aside. Either way, we both have the same end  goal which is a successful day.  Letting the exhibitors know where their photos can be seen and purchased is part of the success for both of us. Having professional photographs done at your event gives it an extra special touch and your exhibitors really appreciate it, but if they can't find them it doesn't help anyone.  So if I can't get the info I need or my info isn't made available to the exhibitors, it isn't worth the time to photograph the event.

Trying not to turn this into one big complaint, so will get back to the main purpose of this post.
How can you help your show photographer?  Here are my top ten suggestions.
Before the show
1. List the photographer on your show bill and other marketing pieces. Helps the show and the photographer-see above.
2. Add the photographer to the show website, facebook page and other web-base listings with their link.
3. Give a list of exhibitors name and numbers, ride times and so forth so they can easily identify exhibitors . Some photographers will separate classes or exhibitors into galleries for easy viewing.
4. Provide them with show schedule, classes and if applicable patterns. This will help them plan their day and having patterns will help them find the best spot for the best image.
5. Let them know were they can and cannot go or if you prefer them only use available light and not use flash or strobes.
During the show
6. Announce that there is an official photographer taking photos, Many times when this is announced several will come up to me and make sure I take photos of them or someone else. They also tell me they didn't know I was there until it was announced
7. Offer a place for the photographer to set up a table if needed or get business cards ahead of time and include in registration packets. They may also want a safe place to keep equipment.
8. Inform them of any unlisted breaks or changes in the schedule. That way they know when it is a good time for them to grab some candids, get a requested portrait shot or even take a break.
9. If you see someone else soliciting photos, kindly ask them not to. If they not stop, ask them for a copy of their business liability insurance and tell them it is require to take photos. That should do the trick.
After the show
10. Provide the photographer with email addresses so they can notify them where to find images. Show management can send also this out.  Be sure to copy the photographer when you sent it out, so they know it has been done.